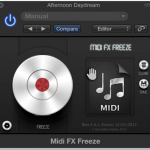
 AudioCR has released Midi FX Freeze, a free AU plug-in for Mac OS X that allows freezing of new Logic Pro X MIDI plug-ins such as chorder or arpeggiator for further editing on track.
It’s easy to use and offers drag and drop support.
Category: Tips & Tutorials
Make Your Own Bootable OS X 10.9 Mavericks USB Install Drive
 DiskMaker X is an application programmed with AppleScript that you can use from Mac OS 10.6 up to OS X 10.9 to build a bootable drive from Mac OS X Lion or OS X Mountain Lion Installation program. As soon as you launch the application, it tries to find the OS X Install program with Spotlight. Then, it proposes to build a DVD or create a bootable install disk.
To build a bootable disk, you’ll need an 8 GB (minimum) USB thumb key drive, a USB, Firewire or Thunderbolt drive or an SD-Card.
Shortcuts to Songwriting Make Music Fast & EZ – MIDI FX Logic Pro X Tutorial [Video]
![]() Shortcuts to Songwriting Make Music Fast & EZ – MIDI FX Logic Pro X Tutorial. This video shows how to use Logic Pro’s MIDI effects to create or add musical performances to your songs.
Shortcuts to Songwriting Make Music Fast & EZ – MIDI FX Logic Pro X Tutorial. This video shows how to use Logic Pro’s MIDI effects to create or add musical performances to your songs.
Like Share Comment !!
Leave any questions in the comments…
Logic Pro X Tutorial Customize the Loop Browser [Video]
![]() When thousands of loops are installed on your hard disks, finding a particular Apple Loop can be a daunting prospect. Fortunately, you can use a number of key criteria—location, scale, time signature—to restrict your search or browsing results. You can also sort the search results. Here’s a quick overview of the Logic Pro X Apple Loop Browser.
When thousands of loops are installed on your hard disks, finding a particular Apple Loop can be a daunting prospect. Fortunately, you can use a number of key criteria—location, scale, time signature—to restrict your search or browsing results. You can also sort the search results. Here’s a quick overview of the Logic Pro X Apple Loop Browser.
Like Share Comment !!
How To Create Dueling Drummers in Logic Pro X – Multi Layer Drum Tracks
A basic overview of creating over laying drum tracks using Drummer in Logic Pro X. The possibilities are endless.
How To Add Custom Track Icons in Logic Pro X
In Logic Pro 9 adding custom icons was a lot easier. However there is a way to do so. First icons are now multi-layer TIFF files instead of single layer PNGs. Second you will have to dig around inside the Logic Pro X App and do some editing.
Below is a video walk though of how I did it, followed by step by step instructions.
First — Right Click on the Logic Pro X app and click on Show Package Contents and follow this path:
Contents/Frameworks/MAResources.framework/Versions/A/Resources
To add them, you need to do a few things:
1. Make sure you back your application file or at least the MAResourcesMapping.plist file you will be editing. I backed up the whole Resources Folder in the video.
2. Create a TIFF image. It doesn’t have to be a multi-layer TIFF You can convert your old PNGs to TIFFs using preview.
The dimensions of the icons where 128×128 in Logic Pro 9, so that’s what I used here.
3. Open MAResourcesMapping.plist from the Resources folder.
If you scroll down, you’ll see a bunch of strings. Search for this line InstrumentIcon_0423
0423 is the last one in the list.

4. Duplicate (copy and paste) the following code. Once for each image you want to add.

5. Replace the following information for each image your adding.
I started at 0600 to be safe in case they add more icons in an update.
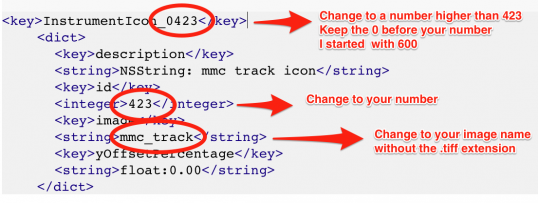
6. Scroll down a bit and you’ll see this code.
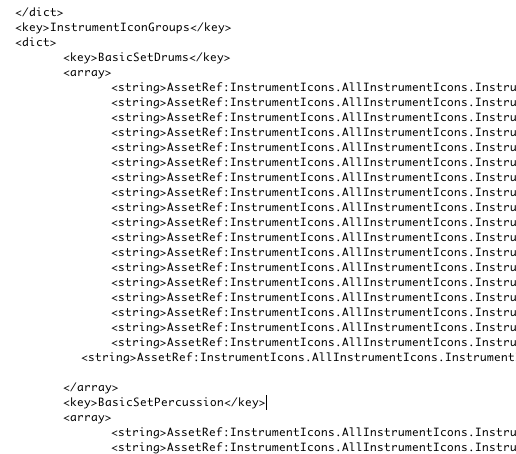
7. Locate the category you want the icon to be in (the code below is for BasicSetDrums & BasicSetPercussion). Duplicate one of the strings, but change the number at the end to your four digit number from above. In my case, using 0600.
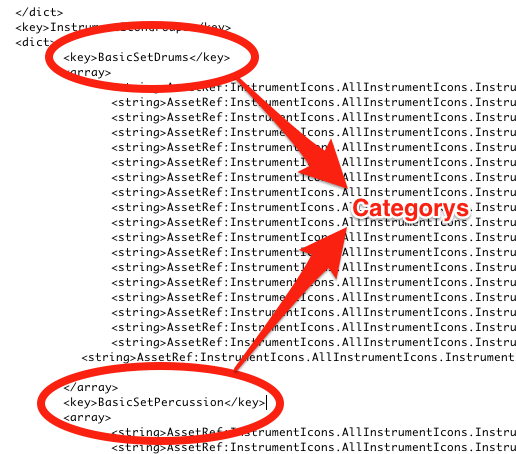
8. Save the MAResourcesMapping.plist file.
9. Add Your Image files to the Resources folder.
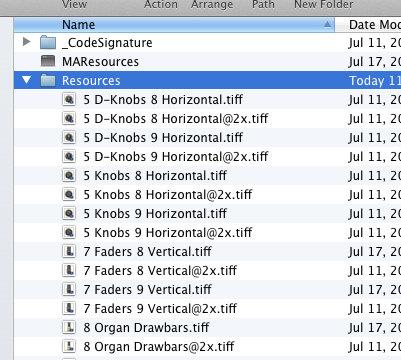
10. Open Logic Pro X and your new icons will be there. You will need to restart Logic if you had the app open while editing.

Leave any questions in the comments…
Logic Pro X Mixing Guitars With Dual Amps & Smart Controls
![]() Several producers like to create larger-than-life guitar sounds by splitting the guitarist’s instrument signal to several different amps, which are then recorded simultaneously. Here’s a quick video on how to make Dual Amps in Logic Pro X and blend them in the mix with smart controls. The possibilities are endless.
Several producers like to create larger-than-life guitar sounds by splitting the guitarist’s instrument signal to several different amps, which are then recorded simultaneously. Here’s a quick video on how to make Dual Amps in Logic Pro X and blend them in the mix with smart controls. The possibilities are endless.
Merge Channel Strip Settings in Logic Pro X Very Cool Feature [Video]
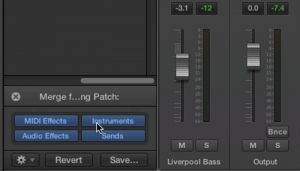 In Logic Pro X you can merge patch settings from another patch with the current patch. This has several uses: for example, you can merge effects with a patch while keeping the existing instrument, or conversely try out different instruments while preserving the existing effects setup.
The patch merging area contains buttons for four types of patch settings: MIDI effects, instruments, audio effects, and sends. By default, all four types are selected, in which case selecting a patch replaces the current patch. By deselecting some items, you can choose which patch settings are merged with the current patch. When you choose a different patch from the Library, only those settings corresponding to the selected buttons are changed, while other settings remain unaltered.
If you deselect the Sends button, the channel strip (or strips) in the patch can access the existing project auxes (or any auxes created by existing tracks/channel strips).
This video shows one way to use patch merging in Logic Pro X. Here I show you how to use an audio bass patch on a virtual instrument.
How Old Are Your Ears? (Hearing Test)
 How Old Are Your Ears? This test is to see how high you can hear.
*MUST WATCH IN 1080p AND USE HEADPHONES*
How high can you hear? Take this ‘test’ to see how old your ears are!
NOTE: The 19,000 Hz frequency has been lost due to YouTube compressing the file.
Logic Pro X Tip: Use Drummer to Control Any Drum Plugin in Real Time [Video]
![]() The Logic Pro Drummer can be used in real time to control other drum sample libraries.
The Logic Pro Drummer can be used in real time to control other drum sample libraries.
Steven Slate Drums – EZ Drummer – and more.